Wednesday, April 20, 2011
May Challenge: Grinding
Sent to you by J via Google Reader:
via The A+M Blog on 4/15/11
All year long, we'll be hosting Charcutepalooza, the meat extravaganza masterminded by bloggers Cathy Barrow (our own MrsWheelbarrow) and Kim Foster.
Each month brings a new challenge (e.g. duck prosciutto, salt curing), and a new roundup of the best posts -- which we'll feature on Food52. Charcutepalooza will culminate in a competition offering an amazing grand prize (details here). You can see a list of past challenges here, read the rules here, and see a list of the bloggers who've signed on here.
Read on below for Cathy's breakdown of May's challenge: Grinding!
• • • • • • • • •
charcutepalooza may challenge. grinding.
by Cathy on April 15, 2011

We're almost half way through the Year of Meat. We've salted, cured, brined, and smoked. Now, it's time to make sausage. Grinding meat from whole cuts, blending in the perfect ratio of clean fats, and flavoring just to your taste with spices, herbs and more – it's nothing short of amazing.

To prepare for this challenge, I sought out expert advice. You Charcutepalooza-er's have a lot of fans out there, and some seriously impressive people were delighted to chime in and make sure we're doing all we can with this great meat-movement.
From the beginning, we've been talking about sourcing the best meat possible – humanely raised and humanely slaughtered. What better time to reassert that intention then when we make sausage? Controlling the quality of the ingredients always results in a superior product. There's a reason for that, especially with meats. Look for pastured, grass fed, happy animals. We are what we eat, and so are they. Antibiotics in my meat? No, thank you. Meat is tastier when the animal is properly raised – and properly slaughtered. Fear hormones released into the muscle fiber will not make for a good final product. Plain fact. This graceful Food Curated video, beautifully constructed by Liza deGuia, (on Twitter, @SkeeterNYC) shows what it means to slaughter humanely.
There are fewer and fewer small scale slaughterhouses – how do we ensure the availability of humanely slaughtered meat? I make it a point to know my farmers. And when I can, I buy farm raised and slaughtered meats, in good part because of one writer's work.
Barry Estabrook's brilliant political food writing in Gourmet opened my eyes and my consciousness. I'm still mourning the loss of Gourmet, but keep up with Barry's insights on his blog, Politics of the Plate. Last January, when Barry published an elegy to Léo, and his life on a rural Vermont farm, I was riveted. When I emailed Barry, he had more to say.
A small-scale meat cutter said to me, as she confronted a huge pile of ground beef on the table in front of her: "They say that corporate meatpackers can't tell you how many cows go into a pound of ground beef – hundreds, thousands, perhaps. I know how many cows went into this ground beef (gesturing) — one."
You'll be buying whole cuts and butchering them down to make sausage. Boneless, or bone in, you will be holding a piece of the animal. It's a good reminder to honor that animal and the farmer who raised it and sent it to slaughter. And the butcher who cut it into a piece you can manage.

The May Challenge: Grinding
From the first chuck roast I made into a hamburger – ground, formed and grilled by me – I was a changed cook. The possibilities were endless. I didn't learn to put ground fillings into casings for years. First, I worked on technique – understanding the grind, playing with textures, adjusting spices. And that's what we're encouraging you to do this month. We're asking you to study the art of meat grinding. Try out different grinding techniques and mechanisms. Play with flavorings. Please refer to our handbook, Charcuterie, for more recipes, further explanations and wonderful illustrations.
And then, go to it. Have fun. And let us know all about your creations.

Using any method to chop the meat, for the Apprentice Challenge, we ask that you make Breakfast Sausage patties.
Using any method to chop the meat, for the Charcutiere Challenge, please make either Merguez or Mexican Chorizo (as bulk sausage.)
Post on the 15th. Tag your post charcutepalooza and we'll be sure to see it. Share your blog post with Punk Domestics. Cross post and upload photos on Charcutepalooza's Facebook page and Flickr page. And don't forget to share all those great original recipes on Food52.
More questions? Want to share your smoking experiences? Have questions about grinders? Monday, April 18th starting at 9PM EDT, there will be a Twitter Chat with Michael Ruhlman and Bob delGrosso. We look forward to seeing you there – just check in at the #charcutepalooza hashtag.
A Farm Visit and Oh, What a Farm
I recently spent the day visiting Bob delGrosso, one of the Charcutepalooza Grand Prize Judges, and charcutier and butcher at Hendricks Farms & Dairy, an artisanal shop/farm tucked away in Eastern Pennsylvania's Mennonite country.

I asked Bob to offer advice to the novice sausage maker. Like much of what we've learned this year, sausage-making is an age-old culinary skill. We discussed boeuf haché, classic French cuisine's minced beef; and the adjective haché. Leave it to the French to have a word specifically describing chopping meat. How about the etimology of the Italian word, mortadella? From the mortar used to grind and emulsify the meats. Yes, clearly, this work can be accomplished by hand. But now there are power-options.

Opening the refrigerator door, Bob showed me the grinding equipment. Solid steel and ice cold, the elements, the feed tube, and the worm (the spinning interior piece) all made of smooth, polished steel. Well-chilled meat passes through the grinder quickly, remaining cold, even after grinding. He had two grinding tips.
The grinder, the worm, the blade, the disks – all must be very cold. The meat should be nearly frozen, so the blade slices cleanly through the meat fibers. Keep everything cold, work quickly and efficiently, and re-chill often. Combine your ingredients well once the meat is ground. Remove the air during this mixing or the end product will be crumbly.
It was a great day – I saw the smoker, talked about butcher shops, met the goats and came home with some amazing food. I promise to write more about my time with Bob soon – it was a fantastic afternoon.
Mise en Space
Stage your kitchen.

You must keep the meat cold before grinding and after – all those exposed cells – warm, ground meat – could breed bad bacteria. Keep everything cold cold cold. If possible, use metal bowls – they hold the chill so well. You'll want one or two big bowls to use as ice baths.
There should be plenty of room in your freezer for grinder parts and bowls of meat.

You'll be toasting seeds, grinding spices, making slurries – set out all that equipment, too. Mortar, spice grinder, blender, food processor, knives, cutting boards and all the spices, salt and ground pepper. Have plastic wrap at the ready.
Take out a small skillet. Once the sausage is mixed, small patties are cooked off for a taste test – does it need more salt? flavorings? moisture? Adjust and taste again. Each time you make sausage, your salt and seasoning needs will change with the taste of the meat you acquire. So, the test patty is part of the process and the cook is the beneficiary.

Use clean hands, or your stand mixer, to combine the ground meat and seasonings really well. As Bob said, get the air out. Dominique, the Chapolard butcher, gathers the sausage mixture in his hands and slaps it down on the work surface, forcing the air from the mixture. Whatever your method, mix it up really well. If the mixture seems dry and isn't holding together, add some liquid, often shown at the end of the recipe as an optional ingredient.
Grinding Meat Using the Food Processor: Breakfast Sausage
Your food processor is an excellent meat grinder. Surprised? Check out this technique primer from Bon Appetit (via Food52.)
For the food processor, the meat and fat are cut into 1" cubes. Toss the meat with the spices and cover and chill. I like to let the meat and spices get to know each other for at least two hours, the last 30 minutes spent in the freezer.

For this challenge, the excellent pork shoulder came from Smith Meadows (Dupont Circle, Takoma Park and Broad Branch farmers markets in the DC area.) The pork back fat was from D'Artagnan, and I must say, it was the cleanest, prettiest fat I've ever seen.
We pulsed the meat and fat in four small (3/4#) batches, checking after 15, 30 and 45 pulses. The texture was perfect after 45 pulses – light and well blended. Once the meat is ground, remove it from the processor to a separate bowl, and keep it cold in the ice bath or the refrigerator. When all the batches are done, work the sausage meats with your hands, removing air and combining all the ingredients. Add cream if needed, to hold it all together.

Fry up a test patty and adjust the spices as necessary. Cream may be needed to help the patty stay together when cooked. Be stingy, add small amounts, and test, test, test.
When it's perfect, go ahead, fry up some patties, add some maple syrup, and have breakfast, or pack it up for storage.

There are two options for storage. Either form patties, freeze them solid on a baking sheet, then package, alternating with parchment paper squares and freeze. Or weigh out one pound of the mixture, then gently form the sausage into a roll, removing any air pockets, and roll it up in plastic wrap. Store in a ziptop bag. Fresh sausage will keep for a week in the fridge, or in the freezer for three months.
My Breakfast Sausage
3 lbs boneless pork shoulder
3/4 lb. back fat
.3 oz dry, rubbed sage
.1 oz Herbes de Provence
1/4 c finely minced fresh parley
5 t fresh thyme leaves, laboriously and annoyingly picked off the stem
2 -3 tsp kosher salt – to taste
1-2 tsp freshly ground black pepper, to taste
1 T heavy cream, optional
Cut the meat into 2″ cubes (1″ if using the food processor) and the fat into 1″ (1/2″ for the food processor) cubes.
Add the spices and mix well. Chill for two hours, the last 1/2 hour in the freezer.
Run the mixture through the grinder.
Mix the sausage meat well, using your hands or the stand mixer paddle attachment to combine and reduce the air in the mixture.
Form patties. Over medium heat, fry the sausage patties in a skillet until crispy on the outside and cooked through.
The sausage will keep one week in the refrigerator or three months in the freezer.
© Copyright 2011 - All Rights Reserved
KitchenAid Stand Mixer Grinder Attachment: Mexican Chorizo
The KA attachment has been my grinding companion for the last two years. It's easy to use, easy to clean, and relatively inexpensive. And it's great for all kinds of things – Hash up some Leftovers! Make Breadcrumbs! Purees! Baby food! You'll go wild.

To set up your workspace, elevate the mixer above the counter by about 3". I use a book or stacked cutting boards. Place a large ice bath in front of the mixer and float the KA mixing bowl in the ice bath. Attach the grinder and adjust so the ground meat will fall into the mixing bowl (not the ice bath!)
Push the chilled meat through the chilled feed tube toward the chilled worm. Feed the meat through, with the speed no greater than #4. The plunger is alright, but using your hands is a little more delicate. If it's good and cold, the meat will slip through without forcing.

When all the meat has been fed in, twist a piece of plastic wrap into a 12″-14" rope, and insert into the feed tube. In two seconds, that magic bit of plastic will push the remaining meat toward the grinding disk, so little is wasted. Turn off the machine as soon as you see the plastic appear behind the grinding disk, remove the entire grinding mechanism and clean it, while the meat chills (again.)
Pati Jinich Talks Chorizo
Pati Jinich, the exquisite Mexican chef, answered my email enthusiastically when I admitted a love of Mexican food, but little experience cooking chorizo. She invited me to her sunny kitchen for a Mexican cooking lesson.

She cooked for me in The Orange Pot!
If you don't know Pati, it's time you did. She's starring in the new PBS cooking show, Pati's Mexican Table, where she guides the viewer through lively, colorful, meals with interludes of music and history – it's a delightful, traditional, expressive, creative romp through Mexican home-cooking. Pati's blog is full of approachable recipes and evocative tales.

Pati transformed chorizo and a few simple ingredients into Pasta Seca – a classic of the Mexican kitchen, with many regional and home-cook versions. It was so delicious and tasty, you can be sure it will be on my home rotation from now on. (Anthony Bourdain would call it out for what it is – great hangover food. Seriously.) Pati's recipe is perfect. Imagine toasted pasta that plumps up not from boiling in water, but from the tomato/chile/onion sauce it's simmering in. Then top it with chorizo – spicy, crispy pork. Crema. Cojita. Avocado. Are you in?

Check out Pati's chorizo post for inspiration. The key ingredient? Vinegar. That's what makes the meat crumbly. In Mexico, the common vinegars are apple cider, plain white, and, recently, rice wine vinegar. There are chorizo versions from every corner of Mexico, including a green chorizo from Toluca (the chorizo capital.) I encourage you to read all about it, then strike out and make a version that speaks to you. Pati's cooking tips for chorizo -
When you cook chorizo, break it up and really crisp it. Let it get well browned. It makes a big difference in how the flavor is infused into the dish. Some Mexican recipes will remove the chorizo from the pan, adding it back at the end, to retain the crunch. Others add the rest of the ingredients to the chorizo, so it becomes a flavoring, used in much the same way as lardons or pancetta.
My Mexican Chorizo
3 lbs boneless pork shoulder or butt
1 large white onion
5 Ancho chiles, dried
3 Chipotle chiles, dried
1 Guajillo chile, dried
1 c boiling water
1 T annatto seeds, crushed
2 T paprika
1 tsp Mexican oregano, crumbled
1 tsp freshly ground black pepper
1/2 tsp Mexican cinnamon
Pinch each ginger, clove, cumin
2-3 t salt (to taste)
1/3 c apple cider vinegar
Cut the pork into 2" cubes and put the meat in the freezer to chill for at least 30 or as many as 45 minutes.
Toast the chiles quickly in a dry skillet just until they are flexible and fragrant. Remove the stem and seeds. If you want spicy chorizo, Pati says, "Save the seeds, toast them lightly and add back in to increase the spicy flavor." Careful, now. They're hot. I add these after taste testing.
Tear the chiles into a few pieces and rehydrate them in a cup of boiling water. Let them soak for about 15 minutes. Drain and reserve the soaking liquid.
Make a slurry in the blender. Add the chopped onion, the chiles, the spices and vinegar to the blender. Add the chile soaking liquid to loosen the slurry until it's just pourable. Chill the slurry while you grind the meat.
Set up the grinder and grind the chilled meat into a chilled bowl perched in an ice bath. Combine the meat with the slurry.
Using your hands or a stand mixer, combine everything well at a low (#4) speed. If you mix with your hands, wear gloves. Use the chile soaking liquid to moisten the sausage, as needed.
Add some chorizo to the tasting skillet and cook until well browned, breaking it up to a crumble. Taste for salt, pepper, and spicy heat and adjust to your liking.
Mix again well, Get rid of the extra air. Pack the chorizo in half and one pound packages. If possible, let the chorizo rest for a day or two before cooking with it. This sausage benefits from a little rest.
Chorizo will keep in the refrigerator for a week, and in the freezer for up to three months.
© Copyright 2011 - All Rights Reserved
The Waring Meat Grinder: Merguez – Lamb and Venison
Paul has a Waring grinder and I have to say, I'm getting spoiled. It's really nice. All metal worm and grinder means the cold is retained, the meat is processed very quickly, and the quality of the grind is gorgeous. There are three grinding disks – very coarse, medium and fine. I particularly appreciate the all metal construction when using spicy, wet mixtures like the Chorizo or Merguez.
We made Merguez, using my food52 Wildcard recipe. (Here's Merrill's new merguez hash recipe, too. I can't wait to make it.)

Lamb shoulder is not an easy cut to find – most of it never comes to market (it's made into sausage.) Be prepared to order ahead. The shoulder has the perfect ratio of fat to meat, and great flavor. We used a beautiful 5# bone-in Australian lamb shoulder from D'Artagnan and everyone agreed it was exquisite. The flavor was earthy and fresh, not gamey, but rich. It was, hands down, the best lamb I've ever used to make this sausage.
As with Chorizo, there are many regional versions of Merguez. Stir up your own spice mixtures, make sure you toast the spices, play with all the flavors. Make a mixture that smells like the souk or like you think the souk should smell. Find a great harissa, or make your own. (I love this one from TasteFood.)

We also made a merguez with venison. It needs more work, recipe-wise, but exhibits great potential. If you have access to game meats, give it a try.
As usual, to complete this challenge post, thanks go out to Paul and Elaine, who joined me for a day of Charcutepalooza. Paul did some amazing butchery work (channeling Dominique Chapolard), deboning the lamb and the venison. Elaine took a lot of the photos, and I wielded a knife, ground spices and made slurries. Six hours and 30 pounds of meat later, several friends joined us for vegetarian cassoulet, grilled Merguez, new season kale, Cowgirl Creamery cheeses, and a few treats from the larder. Oh, and wine. Plenty of wine.
Have a great time making sausage. We can't wait to see what you come up with. Remember what the experts shared – source the very best meat from farms where the animals are treated well. Keep everything cold and mix it up well. And when developing flavors from other cuisines, research regional differences and be creative.
A Little Charcutepalooza Business
Kim, Sean Timberlake from Punk Domestics and I will be presenting a hot-smoking demonstration at BlogHer Food in Atlanta (May 20-21.) If you are in Atlanta, we need help shopping and locating supplies for our demonstration. Please get in touch if you're willing and able. Thank you!
And, when you have a moment – please click on this fantastic Google map to add your location. We hear Charcutepalooza is happening everywhere – please show us where! Thanks go out to Scott for getting this cool map organized.
Charcutepalooza loves our sponsors. Kinetic Web Solutions and @VinoLuci saved me from having a meltdown over Photoshop this week and generally helps us navigate technology. D'Artagnan , generously offering 25% off the meat-of-the-month. If you aren't receiving your email with the secret code for Charcutepalooza members, register here. And the trip to France – an awesome grand prize deliciously designed by Trufflepig and Kate Hill at Camont.
Things you can do from here:
- Subscribe to The A+M Blog using Google Reader
- Get started using Google Reader to easily keep up with all your favorite sites
Making Cheese: Paneer, Pineapple, & Cucumber Salad
Sent to you by J via Google Reader:
via Vanilla Garlic by Garrett on 4/19/11
-Homemade cheese in a tropical Spring salad.-
"It's squeaky!" I beamed.
BF paused his video game knowing that if he did not direct his attention to me I would get between him and the screen and ensure the death of his character. I grinned like a maniac and held out a seared piece of cheese prompting him to eat it. He surveyed the unidentifiable food the way a bomb team would inspect a mine field. He then considered me, possibly as crazy, and somewhat hesitantly pressed for more information, "What's squeaky?"
"The paneer! It's squeaky!"
My explanation being of no help he dropped his gaze back over to the paneer and studied it.
"It's cheese. Please eat it. I just took it out of the fry pan and it is extremely hot," I pushed.
He opened his mouth and I gingerly placed it on his tongue. With his first chew the cheese became audible as the pressed curds began to eek apart as if BF were masticating some terribly scared mice.
"See? Squeaky cheese." It shouldn't have been that thrilling or nearly as funny, but it was. I guess when you make your own cheese for the first time you can't help but contract a dairy high from it.
The past year or so has been a whirlwind of cheese education for me. I've devoured any number of books and websites, and even more cheese all in the name of knowledge and whey (or so I say to justify eating an entire wheel of Petit Basque in a single sitting as if it were going to run away the second I stopped swallowing). At this point the science, the processes, and molds and bacterial cultures and the cheeses they're associated with no longer held any mystery. Each became identifiable and precise to me, and could be catalogued in memory and taste. I feel I can hold my own against many more knowledgeable cheese gurus.
However, there are still two things any cheese fiend still needs to do to be taken seriously by the Dairy World: visit a dairy and make cheese.
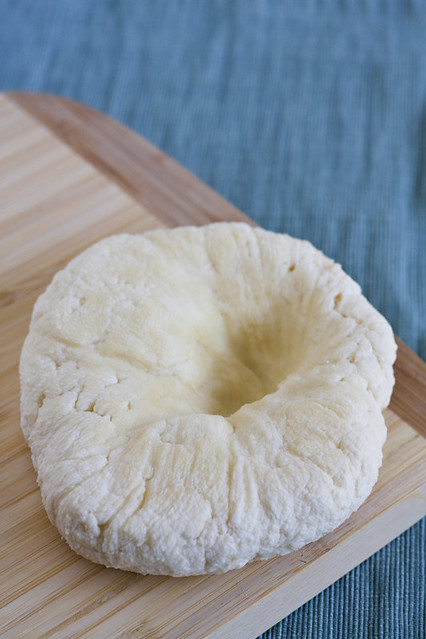
-The divot is there because I knotted the cheesecloth before pressing. The knot then pressed into the paneer. Lesson for you. Wrap and fold. Not wrap and knot.-
The former is something I keep meaning to do. I'll get right on it, soon. When I find time. Probably. The thing is that something inevitably pops up and bumps this task down the to-do list. Deadlines come up for old projects, research has to be done for new ones, studying, cooking, my attempts to revive the walking dead corpse that is my social life, and let's not forget familial guilt over my lack of visiting or calling are all vying for my unmitigated attention.
Believe me, I want to see happy goats and climate controlled caves lined with rounds of cheese stacked in so high they turn the room into a cultured Greek Parthenon. I want to put on plastic booties and a hairnet and see curds cut. My goal is to go home and curse out the washers at my apartment complex because they can't get the primordial barnyard funk of so much cheese out of my clothes from touring a room of elderly blues.
Sadly, that will have to wait.
Anyways, making cheese is more doable and makes for a nifty weekend project.
Cheesemaking is one of those skills that many home cooks have lost. You see, cheese is more widely available than it ever has been and, really, there isn't any practical need for people to know how to make their own cheese outside of personal satisfaction and cooking for cooking's sake. Why go through the trouble of attempting your own Cheddar when Fiscalini produces a stalwart of the breed. Why raise goats when Laura Chenel has been doing such as damn fine job of it for the past 30+ years? (Plus, in my experience, goats can be total assholes. I've been butted a few times and lost a good flip-flop when a goat decided to make a snack out of it.) Making a blue at home is trying at best, but Whole Foods has a special on Bayley Hazen.
See where I'm going? Home cheesemaking isn't a necessary skill. At least, not in the practical average American sense.
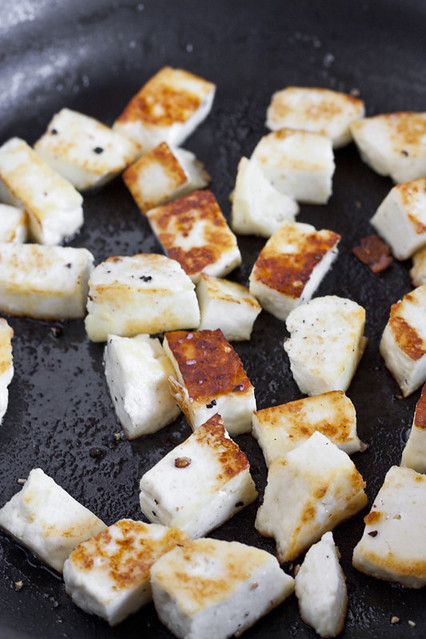
-Toasty cheese!-
But aren't knowledge and adventure reason enough to give it a go? The desire to better understand your obsession and master it is expected. Kids can memorize every minor detail about 650 pokemon. (Though this makes me wonder why our nation's test scores are so low?) Foragers carry books and sheets of white paper to do spore cap tests in order to identify poison mushroom from dinner mushroom. Coders learn C++ to make more engaging flash games, god bless them. Cheeseheads strain and press their own curds.
I decided to make paneer because it's about as 101 as you can get for cheesemaking. Paneer is a simple cheese used in Indian cooking and usually made at home. It is also foolproof cheese. Simply heat some milk, pour in the vinegar, then stir, separate, and press. Congrats, you made paneer. It may sound like I'm breaking this down too much but I assure you that changing the oil in your car is more stressful and requires more experience than this.
The taste of uncooked paneer isn't anything to swoon over. You won't try it and wax poetics about it and you're unlikely to find it gracing a cheese plate. It tastes like concentrated milk, but, then again, that's what it essentially is. Of course, the flavor also depends on the milk you're using. You want to use a really high quality whole milk or top cream whole milk (the latter has more fat). If you use a milk that was made by cows who lived their lives roaming the country side eating grass and flowers and generally playing their happy cow games then it'll taste better than milk from a factory cow who spent its life praying for a quick death that wasn't going to happen.
Cook panner and it becomes an entirely different food. Sauteed in a bit of butter or oil the sugars and fats crisp and caramelize. The milk's origins become loud and brilliant. The paneer takes on a toasty, wheaty flavor that soon submits to the taste of cream and clover. You realize the panner is just as excited as you when it meets your teeth with a cheerful squeak-squeak-squeak of appreciation.
Like other cheeses, paneer can also be flavored to give it character. Some people toss a thread of saffron into the milk as it cooks to impart a bitter flavor and Brahman color. Others mix in some freshly ground and toasted cumin or coriander into the curds before pressing. Cilantro or basil leaves can be wrapped around the paneer before its bundled and pressed in cheese cloth to impart a haunting grassy spice. It's all up to the cook how to alter and flavor the paneer. Paneer, essentially, reflects the personality of the cook.
Unlike other cheeses, paneer is meant to be used as an ingredient and not as a stand alone cheese. It's used in curries, wrapped in pastry and deep fried into fritters, sautéed with vegetable, marinated in chilies… paneer is essentially an everyday staple food used in a variety of dishes. It's also a great food source for vegetarians looking to add some texture and unique flavor to their food. I've discovered that it's also excellent in omelettes, tacos, and tossed in a pasta buried in a garlic-heavy tomato sauce.
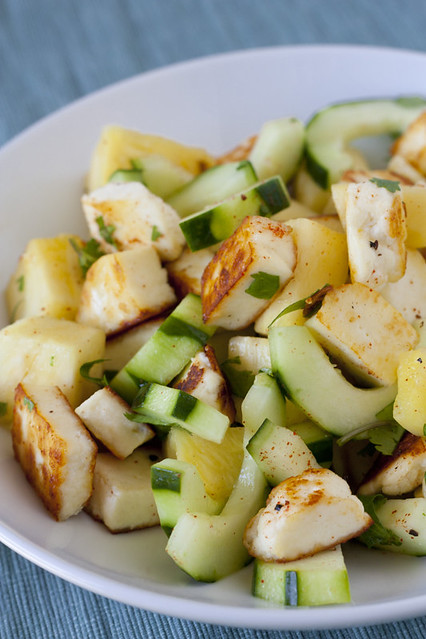
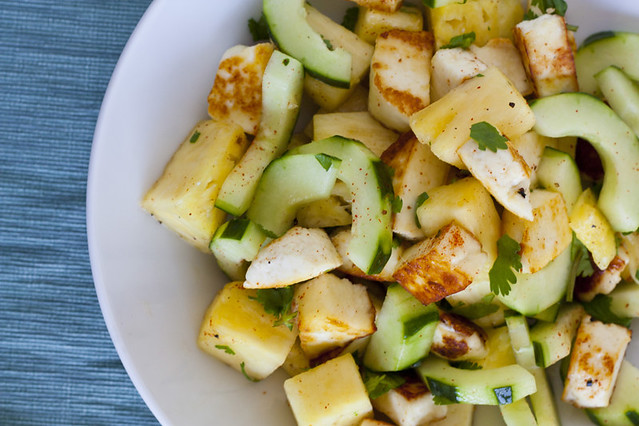
This panner recipe is a simple one you can do any night of the week. I've personally found that paneer is fabulous in fresh salads. Tomatoes and greens are great, but tossing it with cucumber and pineapple is a fresh, spring-y salad perfect for warm weather.
Anywhose, give it a try. You'll love it. Even better? You can cross "learn to make cheese" off your list.
Paneer
Do not substitute anything for the whole milk. Cream will result in soft paneer and skim won't yield much of anything. Makes two cups of cubed cheese.
1/2 gallon whole milk
1/4 cup white vinegar
In a heavy-bottomed pot bring milk to a boil over medium-high heat. Slowly add the vinegar and stir. The curds and whey will separate. Pour into a stainer lined with cheesecloth (a thin tea towel could also work). Wrap up the curds tightly. Place in the sink and weight down with a cutting board topped with something heavy like a hefty cookbook or a kettle filled with water. Allow to drain for two hours. At this point you can use the paneer or wrap it in plastic wrap and store in the refrigerator for up to three days.
Paneer, Pineapple, Cucumber Salad
Serves 2-4
1 recipe paneer (see above)
1 tablespoon olive oil or butter
1/2 cucumber, peeled, seeded, and sliced
3 cups chopped pineapple
1/4 cup of cilantro, roughly chopped
juice of 2 limes
pinch cayenne
salt and pepper
1. Dice the paneer into bite-sized pieces. Set aside.
2. Place oil or butter in a pan over medium-high heat. Add paneer, lightly salt and pepper it, and sautee until lightly browned on all sides.
3. Toss together all ingredients. Taste and adjust spice and salt to taste. Serve.
Things you can do from here:
- Subscribe to Vanilla Garlic using Google Reader
- Get started using Google Reader to easily keep up with all your favorite sites
Iced Coffee 101
Sent to you by J via Google Reader:
via The A+M Blog on 4/19/11

- Merrill
Every year, usually around this time, I feel the strong urge to make the shift from hot coffee to iced -- and once I switch, I usually stick with it until fall rolls around. It's a bit of a coffee conviction. And I happen to be more particular about my iced coffee than my lattés and drips. To me, it's important that the coffee be strong enough to stand up to a generous ration of milk, but there should be enough ice to ensure that the coffee stays cold, and the sides of the cup dewy. The solution to what seems like an insurmountable challenge? Espresso ice cubes, of course!
With just an ice cube tray and a little planning, you too can soon be sipping a frigid, rich iced coffee in the comfort of your own kitchen.
Iced Coffee
Serves 1
- 1 to 2 cups brewed, cooled espresso
- 1 cup sugar
- 1 cup coffee, cooled
- Milk to taste

Iced Coffee
Here's how you make the iced coffee.

First, get out your best ice cube tray. Amanda recently got this one at Muji. We love the square cubes it makes!

We're big fans of espresso at the push of a button. Apologies to all the purists out there -- sometimes speed is of the essence!

I started with a cup and a half.

Then I made another long shot to top off the last few hollows.

See the other funky ice cube tray behind this one? Perfect for nearly 5-year-olds.

While the cubes were freezing, I combined sugar and water (in a 1:1 ratio) to make a simple syrup.

You just need to stir until the sugar dissolves.


Next, I brewed up a strong pot of coffee in the French press.


Espresso ice cubes are done!

The ice cube tray is rubber, so it's really fun to push out the cubes.

The cubes have a little cap of foam, just like the perfect cup of espresso!

Coffee on coffee. Yum.


All it needs now is a little milk!
Things you can do from here:
- Subscribe to The A+M Blog using Google Reader
- Get started using Google Reader to easily keep up with all your favorite sites
Subscribe to:
Comments (Atom)